• Contact
  • Etsy Shop
  • About Me
  • Home

The Happy Scraps

a creative blog

  • DIY Projects
  • Cricut
  • Holidays
    • New Year’s
    • Valentine’s Day
    • St. Patrick’s Day
    • Easter
    • Mother’s Day
    • Father’s Day
    • Independence Day
    • Halloween
    • Thanksgiving
    • Christmas
  • Paper Crafts
    • Banners
    • Cards
    • Mini Albums
    • Printables
    • Scrapbook Layouts
    • Wreaths
  • Sewing
  • Recipes

Framed Last Name Decor

September 24, 2012 By Amy | The Happy Scraps 14 Comments

0 shares
  • Share
  • Tweet

One of the projects that has been on my to do list FOREVER has been one of these.  A Frame with our last name and established date.  I’ve thought of many ways to do this, but when I sat down to finally do it, this is what I came up with.

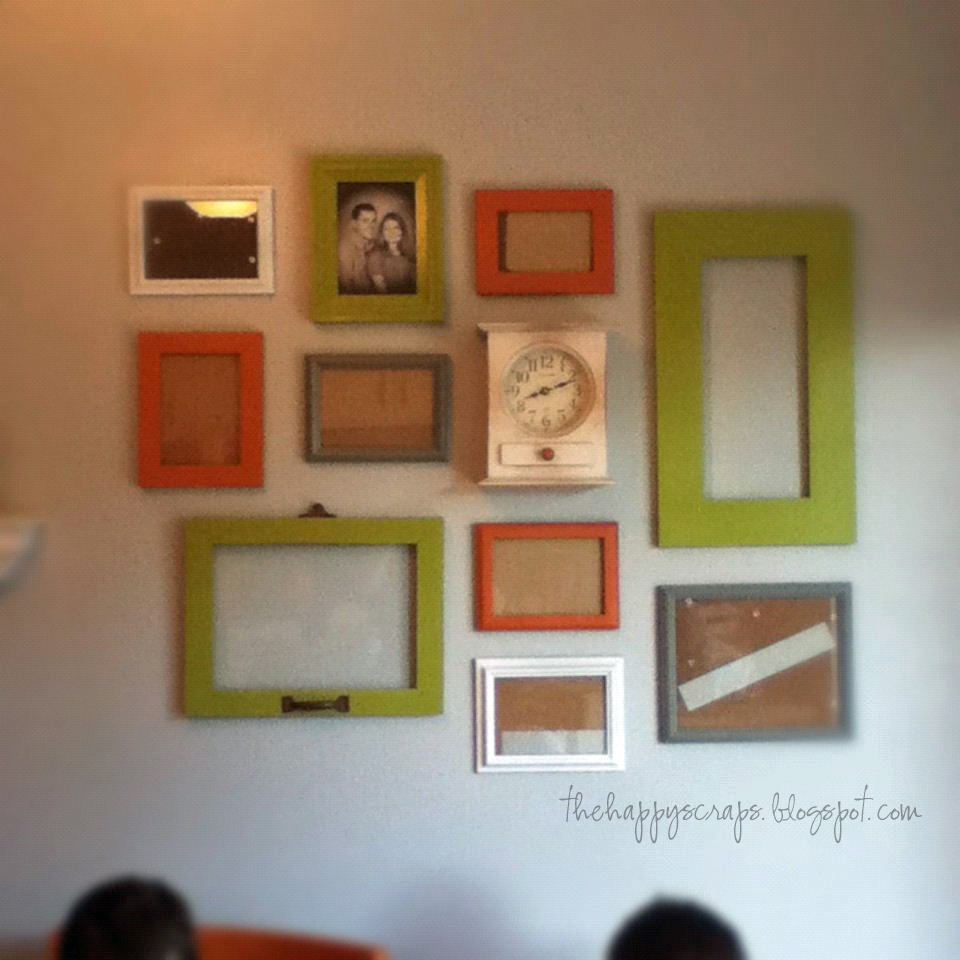
If you follow me on Instagram, then you’ve probably seen this.  My sister helped me figure out the placement for the frames etc. on this gallery wall.  I spray painted them all to match the colors I’m using in the kitchen, and then hung them up.  After they were all hung, I was worried that it looked too much like Halloween, so I posted on Instagram and Facebook to see what others thought.  I’ve decided to get the pictures put in all of them, and then see what I think before I go changing them to a different color.  So this is how it is for now.

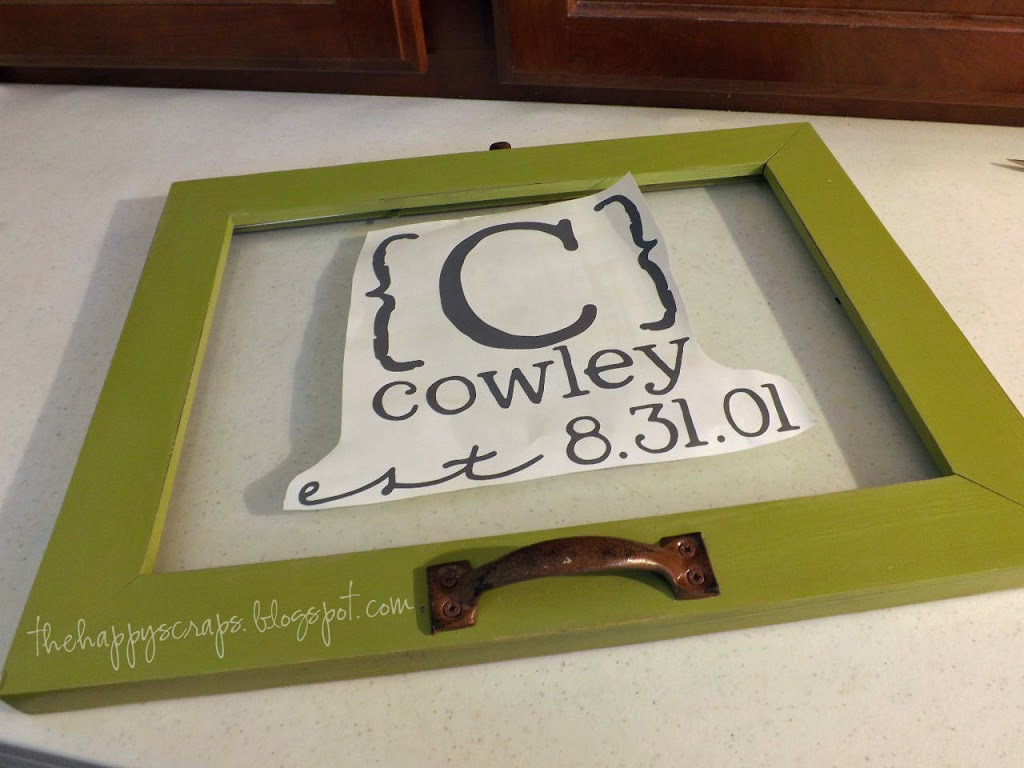
I started out with this empty frame.  This frame/window is one that I bought from Cabela’s years ago and it came with a fabric art piece that was all different kinds of apples.  It hung in my kitchen for a long time (I decorated with apples) and now that I’m changing things up, I decided that I wanted to take the art out of it and use the frame for something else.  I took the cute hardware off the frame and gave it a coat of spray paint.

Once I had the frame all ready, I opened up my Cricut Craft Room, and designed my vinyl using the  Stamped, Doodletype, Opposites Attract, and George & Basic Shapes cartridges. Then, using my Cricut, I cut out my vinyl.

Once I had my vinyl cut, I separated the the negative vinyl space from the space I needed to keep.  (I tried to take a picture of this step, but all you could see was gray.)

Next I cut out and applied my transfer tape.

Then carefully peeled up the image.

Found the center point, and put the vinyl on.  To get the vinyl to stick well, you can use a credit card, squeegee type tool, or my favorite is a pampered chef scrapper to get it nice and smooth.  When you pull the transfer tape off, you’ll want to pull it slowly at an angle.

And then you are done.

I can’t believe how long I’ve had this project on my to do list.  It took all of about 30 minutes to make from start to finish (but my frame was just ready and waiting for it).  I wonder how many other 30 minute projects I have sitting around! 🙂

Do you have an “established” sign for your family that you display?  I can’t wait to get the pictures printed up for the rest of the frames so I can share the whole wall with you, along with the rest of the kitchen that I’ve been updating.  Hopefully I can share all of that before too long.

Filed Under: DIY Projects, Home Decor Tagged With: cricut, frame, gallery wall, last name, vinyl

« Halloween Wall Hanging
Easy Handmade Thank You Card »

Comments

  1. Jani says

    September 24, 2012 at 1:17 pm

    I like it!

    Reply
  2. Jonie Marie says

    September 24, 2012 at 1:29 pm

    Very cute! I love the colors you used!

    Reply
  3. Liz says

    September 24, 2012 at 2:28 pm

    Love this! I have been wanting to do this for my home for ages – loving the inspiration!

    LB
    http://www.accordingtol.com

    Reply
  4. Tracy Snyder says

    September 24, 2012 at 5:04 pm

    Great job! I love the fonts you used and how you laid it out with just the “C” above your last name. I just made something similar for a wedding gift. After seeing yours and theirs I NEED one now too. Thanks for sharing yours.

    Reply
  5. Tracy Snyder says

    September 24, 2012 at 5:44 pm

    Great job! I like the fonts you used and how you placed the “C” above your last name. looks great! I did a similar project as a wedding gift this weekend http://athomewithsweett.blogspot.com/2012/09/personalized-wedding-gift.html
    After seeing yours and theirs I NEED one too. Thanks for sharing yours!

    Reply
  6. Jess from Coxs Corner says

    September 24, 2012 at 6:00 pm

    Doesn’t it feel great to get those projects checked off your list?! I love how it turned out!

    Reply
  7. Gina Baker says

    September 24, 2012 at 10:57 pm

    Very cute! I need to use vinyl… and I am still working on something similar for a gift for my brother. Have a good day!

    Reply
  8. Lauras Crafty Life says

    September 25, 2012 at 3:24 pm

    I love this. I have been wanting to do a project with an empty frame for a while now. Yours turned out great!

    Reply
  9. digitaleramom.com says

    September 26, 2012 at 3:48 pm

    This is just one more reason I need to get a Cricut. We don’t have an Est. sign simply because of the way that our family kind of came together, there’s no real est. date.

    I would love to do a project like this, though! It’s gorgeous!

    Reply
  10. Jess from Coxs Corner says

    September 29, 2012 at 5:21 am

    I know I already commented…but I just wanted to thank you for linking up at our first linky party! I really do love how this turned out! I can’t wait to see what you link up next week at Artsy Corner!

    Reply
  11. Kathryn Pepper says

    October 1, 2012 at 12:33 am

    You seriously always make the cutest things! I’m featuring this tonight at the link party. Thanks for linking up…as usual!!

    Kathryn
    destinationcraft.blogspot.com

    Reply
  12. Lindsay @Artsy-Fartsy Mama says

    October 1, 2012 at 4:03 am

    Love everything about this and your gallery wall! So dang cute! Keep up the amazing work!
    Thanks for sharing at Artsy Corner!

    Reply
  13. Michele Alger says

    October 15, 2012 at 5:20 am

    This project makes me feel like learning how to use vinyl on my cricut! Thanks for the wonderful inpirational project. LOVE IT!!

    Reply
  14. kellie smith says

    January 11, 2013 at 12:18 am

    LOVE IT!! Great job and thanks for sharing 🙂

    Reply

Leave a Reply Cancel reply

Your email address will not be published. Required fields are marked *

CommentLuv badgeShow more posts
  • Farm Sweet Farm Front Porch Sign with the Cricut Maker 3
  • Farm Fresh Eggs Kitchen Sign
  • How to Make a Summer Hat with the Cricut Joy
  • Bless Our Farmhouse Kitchen Sign
  • Welcome to the Farm Front Door Decor
  • How to Use Offset in Cricut Design Space

Popular Posts

Page Ranking Tool

Categories

Archives

The images and text on this site are copyright of The Happy Scraps. If you would like to feature a project or image on this site please email [email protected]. Thank you! Please read the Privacy Policy and Disclosure here.

Copyright © 2023 · Tasteful theme by Restored 316

Copyright © 2023 · Blog Design by Key Lime Digital Designs · WordPress · Log in

0 shares