This is a sponsored conversation written by me on behalf of Cricut. The opinions and text are all mine. This post contains affiliate links.
I’ve been using a Cricut for years! I got my very first original Cricut for Christmas in 2007. I was SO excited! I couldn’t wait to start cutting things. It came with one cartridge and I used that cartridge so much cutting anything and everything that I could so I could make banners, home decor, scrapbook pages, and cards. It was so much fun! Through the years, I collected a lot of Cricut cartridges and also a lot of Cricut machines. I’ve had almost all of the different machines that have been made. My favorite, by far, is the Cricut Explore Air 2. There are so many things you can do with it! Today, I’m going to show you How to Upload Your Own Images in Cricut Design Space and you won’t believe how easy it is! One of my favorite things to do with the Cricut Explore Air 2 is to design my own images and designs in Photoshop Elements and then bring it into Cricut Design Space to be cut.
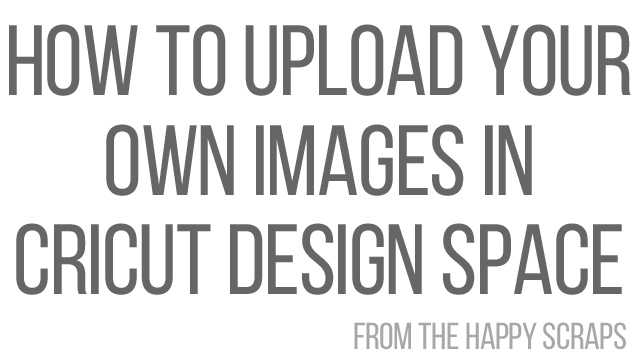
To start, you’ll click on “UPLOAD IMAGES” on the left-hand side. Next you’ll click the blue “UPLOAD IMAGE” button.
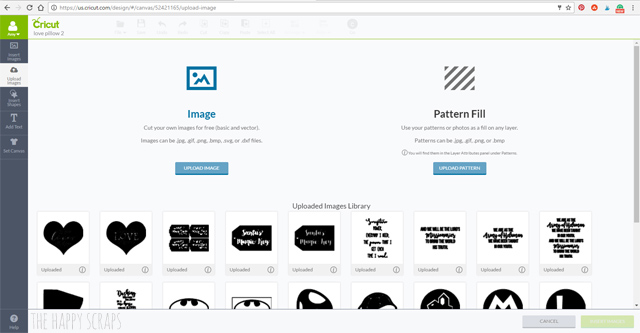
Once you are on this screen, click “BROWSE”.
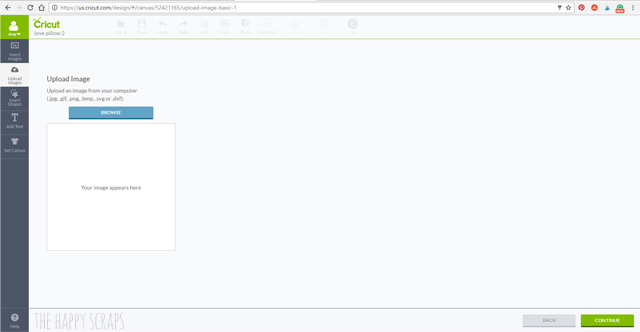
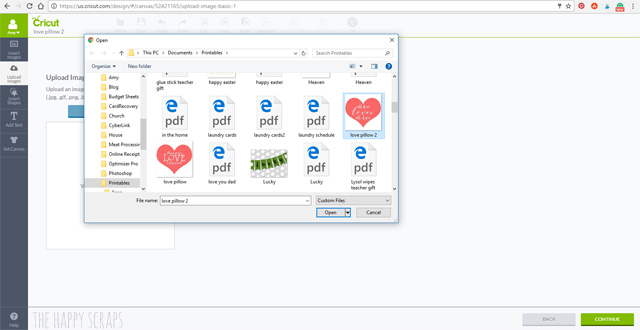
It will open up the files on your computer. Navigate to the image that you want to upload. Click your image and press “OPEN”.
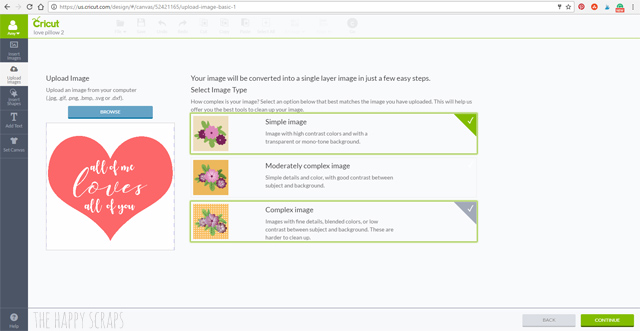
Once your image is in Cricut Design Space, you’ll be able to make some edits to it. Choose the best image type for what you’re doing. For this image, I selected “SIMPLE IMAGE”, then clicked continue.
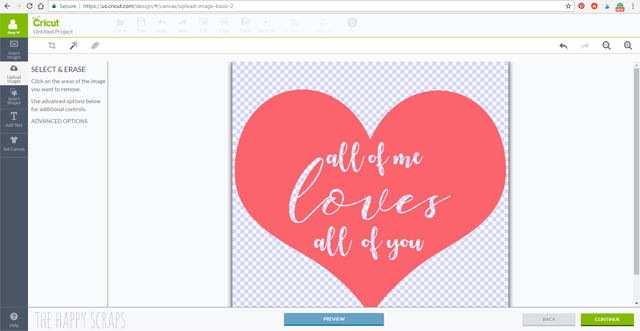
Now I can erase anything that I don’t want to be solid in Cricut Design Space.
I clicked on all the white space, turning it to transparent. Then I clicked continue.
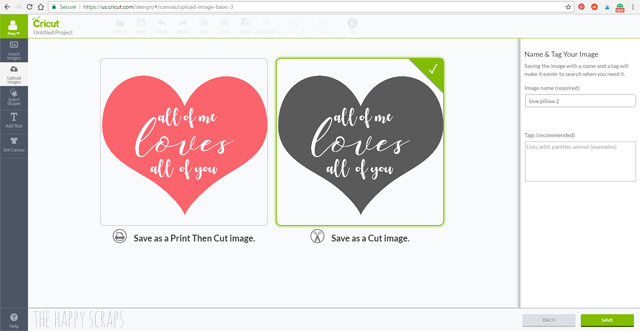
I like to save my images as cut images, so I selected “SAVE AS A CUT IMAGE.” Then I clicked save.
Now the image shows in my uploaded image files. It’s there at the bottom.
The possibilities are endless with being able to upload your own images in Cricut Design Space, and I love how easy it is to do!
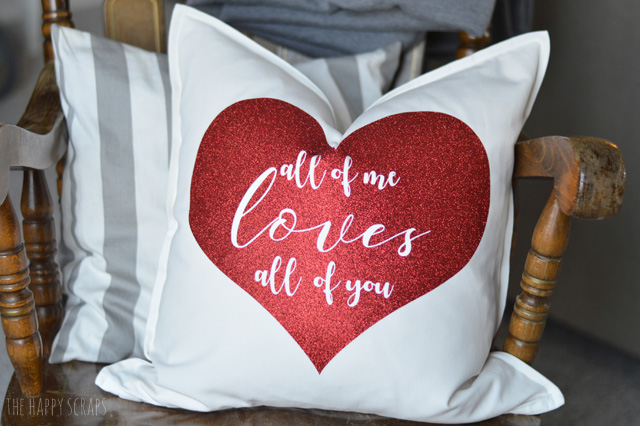
It’s always fun to create your own designs and use them in your home or on projects. Pillows are a favorite of mine to create. This is the pillow that I created using the file uploaded above. You can get all the details for creating your own like it HERE.
This is a sponsored conversation written by me on behalf of Cricut. The opinions and text are all mine.

Amy, thanks for the Cricut lesson. Mine is still in the box form last fall when I bought it on sale. This just might get me to set aside everything else and open the box and jump in. Pinning to my Cricut board.
Carol, you’ve got to get it out! 🙂 It is so fun to use and play with. I just it multiple times a week. Once you get the hang of it, you won’t want to stop creating. 🙂 Good luck!
After I do all this, how do I get image onto my Cricut Expression?
Hi Margi,
As far as I know, Cricut Design Space only works with the Cricut Explore machine. I am not aware of a way to make the Expression work with Cricut Design Space.
Thanks, picked up a few tips. I have a question. I have some personal pics and graphics where I want to extract one object. DS does it, but sometimes the object edges are not smooth and I would love to put a small white border around the object and cut that, not the more intricate, real edges. Is there a way to do that?
I don’t believe there is a way for the images to be outlined. Have you tried different image types to see if you get a different outcome? Maybe try that and see if you get a smoother edge. Also, you could maybe erase a little more when you are importing your images to make the edges a little more smooth.
Just got mine a couple of weeks ago. Been playing with it but not as much as I want to. Still trying to work things out but watching lots of tuturiols. Unfortunately as I’m in Australia can’t purchase any of the great ideas in Cricut Space/Shop as not available here. Somewhat disappointing. So working out other options I can create with. (Any other Aussies here?)
When I upload an image that I found on the internet, when it’s in the box, the whole thing is black so I cannot “clean it up.” Do you know why that happens?
I’m not sure. Have you tried all the different image types? Simple image, Moderately complex image, and Complex image? Sometimes selecting a different one of those will help the image separate the way you’d like it to.
I have the same problem!
I’m not sure why this is happening. Did you try all the different ways to edit the image? What did the image look like when you saved it?
I have the same problem! Has anyone found the reason as to why this happens?
I’m not sure why that is happening. Are you able to try the different ways to clean up the image? Simple image, Moderately complex image, and Complex image? That is the only thing I can think of that might make a difference. Also, what is the file type?
I don’t know why it happens. But I’ve had the same problem. To get around the problem, I re-saved the image as GIF in Photoshop. Then re-uploaded. I had to delete the background areas by hand. But at least I could then cut the image.
I need this info also. My image comes in black also. email [email protected]
Can this be done with circuit expression?
Hi Cristal,
As far as I know, Cricut Design Space only works with the Cricut Explore machine. I am not aware of a way to make the Expression work with Cricut Design Space.
Is there anyway to upload your own images using an iPad?
I am not sure. I will see what I can find out and let you know. 🙂
What does the camera option do on Cricut Design Space using IPad? It doesn’t allow me to take picture.
I am not sure, I’ve never used an iPad with Design Space. I will see what I can find out and let you know. 🙂
Hi Amy, I’m a new Cricut user and I’m trying my best to accomplish my first project by the beginning of next week. I’m having an issuing with uploading my own images. When I get to the step where I have to erase the background/space I don’t want or need, there is a weird box that appears in the upper left hand corner. This is super frustrating for me, as I feel very limited to what I can use because I’ve had this problem a few times so far. I’d love your help. Thank you.
Is it happening when you zoom in or out? I think I’ve seen that box before. Usually if I start over, I can get it to work. Is your adobe flash player up to date? It could be something with that. Let me know, I’m happy to try and help in any way I can. 🙂
Hi!
To upload my own images, are there limits or certain restrictions like formats etc?
I’ve used .jpeg and .png, and I know you can upload .svg, but I’ve never done it.
So these machines make stencils?
I use my Cricut machine to cut vinyl stencils for painting signs. You can also cut thicker material to make stencils from. Let me know if you have any other questions. 🙂
I have followed your steps and nothing is coming up in my uploaded images library. I can’t figure out what I am doing wrong and am about to just give up and sell the thing. Please help!
I would be happy to try and help. Do you want to email me the details of what is happening? [email protected]
Jessica did you unzip the file first before you tried to uploaded it?
Hi! Thanks for the tutorial. My uploads I can edit it but when I go to cut and it shows the image before cutting, it shows the mat is only eight and a half by 12 it won’t let me cut it after that it says cutting image not found what am I doing wrong?
Thank you!
Will it let you change the mat size? Try it in design.cricut.com and see if that makes a difference.
Hi Amy,
I have a saying I want to upload and then cut in vynl. How to do decide whether to click on “Save as a Print, then cut image” or as a “Cut Image”.
Also, there is a border around it which I want to erase. Do I do that by clicking on Simple Image or one of the other two choices?
Hi Pat,
You can erase the border by clicking on either simple, moderately complex or complex. I’ve only ever used the first two, I’ve had good luck using moderately complex for things. For me, it’s been a little bit of trial and error figuring out which one to use. For the Save as, I am very rarely saving things to print and then cut, so I always save as a Cut image. Sometimes it’s a little bit slow loading that way, but if you are cutting vinyl, then you want to save it as a cut image. Let me know if you have other questions, and I’d be happy to do my best to answer them. 🙂
-Amy
How can u upload if you are using design space on your phone or tablet
I don’t believe it is an option to upload using a phone or tablet. I believe it only works on a computer.
Hi Amy!
I need some help! Every time I upload an image into the Cricut Design Space it distorts my image some. Doesn’t matter which option I select(simple, moderate complex) it seems like the program “bolds” my picture and I lose fine lines and smallish gaps. Any tips or tricks to get this to stop or am I just doomed to this always happening?
Thanks!
What types of files are you uploading? Do they have very small details? I think I’ve had this happen before, but it’s usually when I try to upload a low resolution image off of the internet or something like that.
I am uploading an image and it is huge. Is there a way to reduce it in cricut design space. I can’t even see it on the screen.
As far as I know, the only way to reduce the size in Cricut Design Space is to either zoom out and grab the corner to size it smaller, or up at the top in Design Space, you can tell it what width you’d like. You could just put 5 inches in there, so it’s small enough to handle and then size it to the size you need by dragging the corner. Let me know if you have other questions.
Hi, I have been trying to upload my own images and I get all the way to the part where I’m supposed to click continue right before saving it. My design space won’t let me click on continue. Do you know why this is happening?
Hi Chelsea,
I just tried to duplicate the issue you are having. I didn’t have any trouble with uploading a design. So you are able to edit the image, and once done with editing the uploaded image, it won’t let you click continue? Have you tried it again since Saturday by chance? I was having a few small issues with Design Space last Thursday/Friday (I wasn’t uploading images though) and I wonder if it’s working better today.
Is there a way to upload a personal image or design using the phone app?
Yes. I’ve never done it, but they are actually doing a live video on FB right now. Here is a link. https://www.facebook.com/OfficialCricut/videos/10154979071101434/
Is there any way to draw the image I uploaded instead of cut it out? I would like to print it on vinyl. I am such a rookie this is so aggravating for me. Thank you in advance and I’m sure I will have more dumb questions coming soon 🙂
When uploading, right before you save, you can select to save your image as a cut file or as a printable file. I would suggest using printable vinyl. It sounds like that is what you would need for what you are trying to do. Let me know if you have other questions. I’m always happy to answer them the best I can. 🙂
Do you have to erase all the pattern around your uploaded image or just the white within the image?
Anything that look solid in the image while editing it, will be black/solid in your image. You want the checked/transparent background for anything you don’t want to be part of your image. So yes, in most cases, you need to erase the pattern all around your image. There is a magic wand tool that you can use to make it erase large sections that can make it easier too. Let me know if you have other questions, and I’ll do my best to answer them.
It’s super lame that you can’t share a Cricut project that contains an uploaded image “to respect the intellectual property rights of others”, EVEN IF IT’S YOUR OWN IMAGE!
I share links to images all the time, the users just have to upload them to Design Space themselves. I do believe that this is something that Cricut is working on though.
Thanks for your response. However, I was referring to sharing PROJECTS, not links to images.
I often use SVG images as a basis for complex Design Space projects, typically involving both writing and cutting. The people I want to share with are less well-versed in using DS and may not know how to re-create a complex project essentially from scratch.
More generally, I should be able to share my own projects containing my own images with whoever I want. It’s not Cricut’s job to police every image that anyone uses, especially since there are no alternatives to Design Space.
A simple checkbox, something like “I certify that I own, or have permission to use, all images in this project” should suffice to cover Cricut’s liability, and would be easy to implement in a future DS update.
Hey there 🙂
I’m a new Cricut user and was wondering if I could upload a picture of my own hand drawn artwork to design space. I’m wanting to make a stencil.
Yes! You can upload your own artwork. You can do this by scanning your image to your computer, or you can take a picture with your phone, email to to yourself and upload it. If you take a picture, you just want to make sure that the lines are all thick. Also, using a white background with black ink will work best. You’ll just erase the white when uploading it. Let me know if you have questions, and I’ll be happy to do my best to help you with that.
Thank you!!! I’m new to Cricut and have been searching in frustration for this. Your step by step makes it simple.
A Disney trip is coming in 15 days and now the shirts will be ready.
THANKS SO MUCH!
I’m so glad this could be helpful! I hope you have fun on your Disney trip!
If you download a svg that you purchased on easy into cricut design space, will you be able to cut it if you don’t own it from cricut?
Yes! I buy images on Etsy all the time and upload them to cut on my Cricut machine.
I keep getting spinning green wheels so I can’t save as a cut image. Don’t understand what to do about it
I’m not sure why that would happen. Were you able to get it to work since you commented here? If not, I would recommend calling Cricut customer care.
Hi! Is there a way after you upload an image to do an only draw on paper? Can’t figure how to not cut and only draw. Thanks!
I’m not sure if you can draw without cutting. I haven’t tried that before. You could place a box around your design, and have it cut that, I would think. That is not something I have tried though.