• Contact
  • Etsy Shop
  • About Me
  • Home

The Happy Scraps

a creative blog

  • DIY Projects
  • Cricut
  • Holidays
    • New Year’s
    • Valentine’s Day
    • St. Patrick’s Day
    • Easter
    • Mother’s Day
    • Father’s Day
    • Independence Day
    • Halloween
    • Thanksgiving
    • Christmas
  • Paper Crafts
    • Banners
    • Cards
    • Mini Albums
    • Printables
    • Scrapbook Layouts
    • Wreaths
  • Sewing
  • Recipes

Paper Succulent Centerpiece

July 12, 2017 By Amy | The Happy Scraps 27 Comments

7993 shares
  • Share
  • Tweet

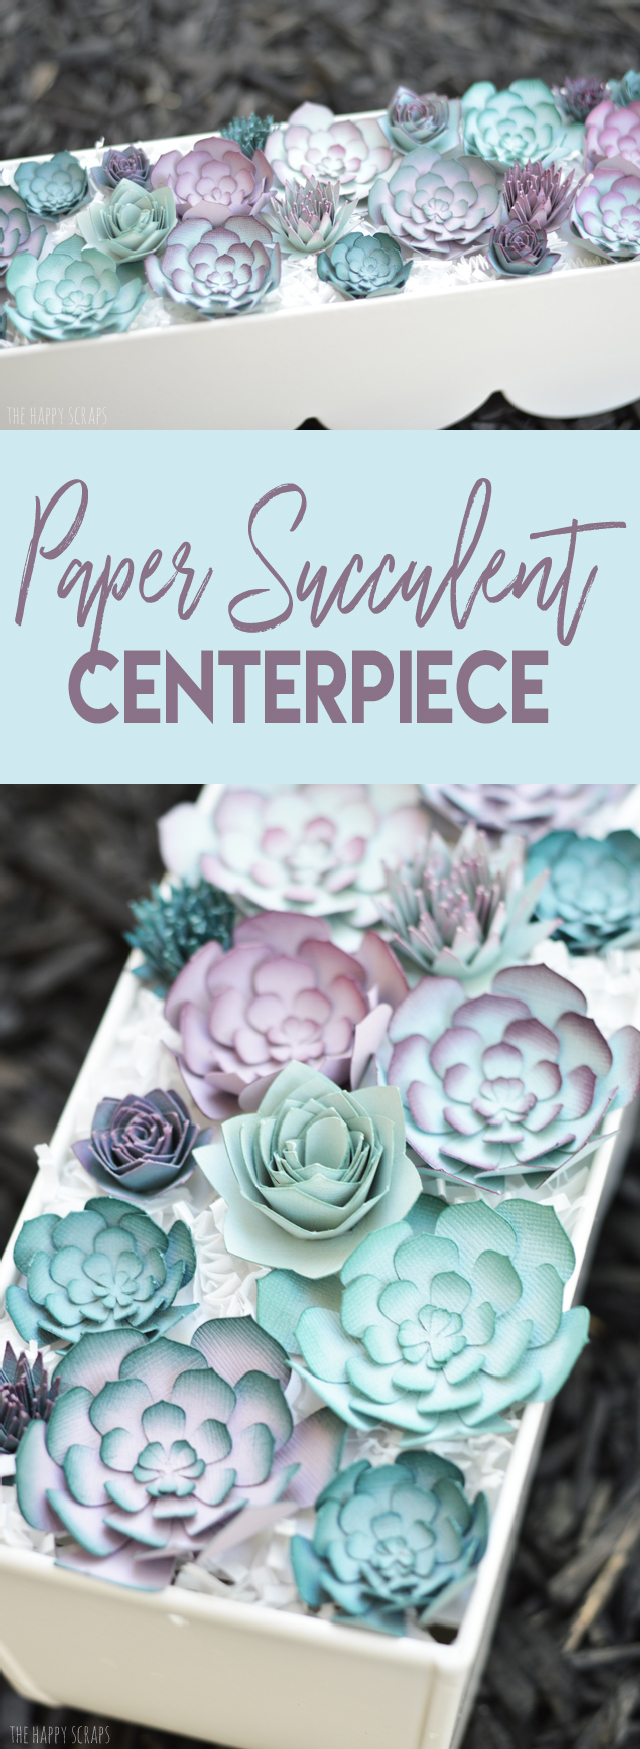
Please tell me I’m not the only one who has those days/weeks/months! I was going to share this with you on Tuesday, but I just didn’t get to it. The last three weeks have been kind of crazy for me. My husband was on his way to scout camp a few weeks ago, in my car, when it started smoking. As it turns out, my car needs a new front axle. Anyway, since my car could no longer go to scout camp, the truck that my husband was leaving for me to drive that week, then got to go to scout camp. I was hoping that my car would be gone about a week or so, but we are nearing three weeks. Friends, not having a car is the pits! They were able to find a used part for it, which is good, because it’s less expensive, but the last time we called and checked a couple of days ago, they still hadn’t gotten the part. 🙁 So, I’ve basically been stuck at home for nearly three weeks. During the summer with a house full of boys, it’s not exactly my idea of fun. Anyway, on top of all that, my baby has had a fever this week, I’m pretty sure he’s teething, but he sure hasn’t been himself.  I am finally sitting down to write this post though, even if it is a couple of days late, so here you go. 🙂 This project has been a long time coming. Maybe it’s because it’s summer and the kids are home, or maybe it’s just because I haven’t gotten it done as quickly as I had hoped. I’ve been working on it since May, but it’s been a thought in my mind for probably about a year. I am happy that it’s finished now and I’m finally sharing it with you. As with most projects I plan to make, things always seem to change a little bit as I’m working on the project and this project is no different. I started with different shades of green paper, but then I decided to go more teal and purple, and I really adore the way this Paper Succulent Centerpiece turned out.

Create a stunning Paper Succulent Centerpiece that doesn't need to be watered or taken care of. It's a great piece for anywhere in the home!

This post contains affiliate links. All ideas and opinions are my own.

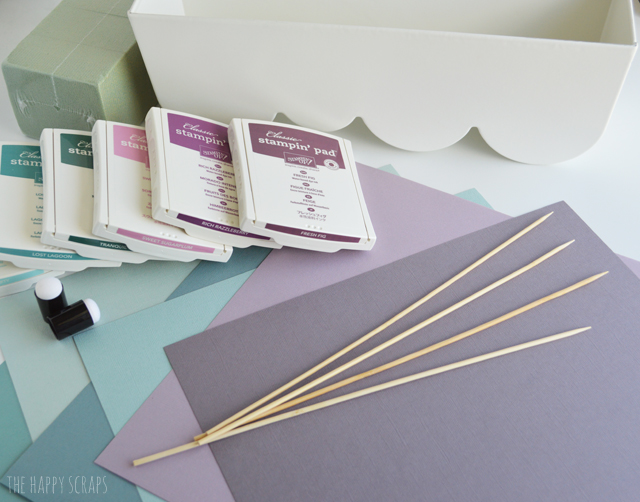
Paper Succulent Centerpiece Supplies:

  • Succulent Colored Cardstock
  • Succulent Colored Ink Pads
  • Cricut Explore Air 2
  • Cricut Cut File
  • Ink Daubers
  • Hot Glue Gun
  • Container
  • White Foam Core Board

Create a stunning Paper Succulent Centerpiece that doesn't need to be watered or taken care of. It's a great piece for anywhere in the home!

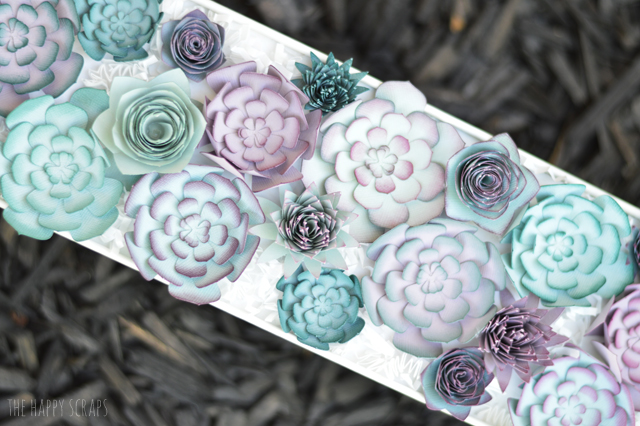
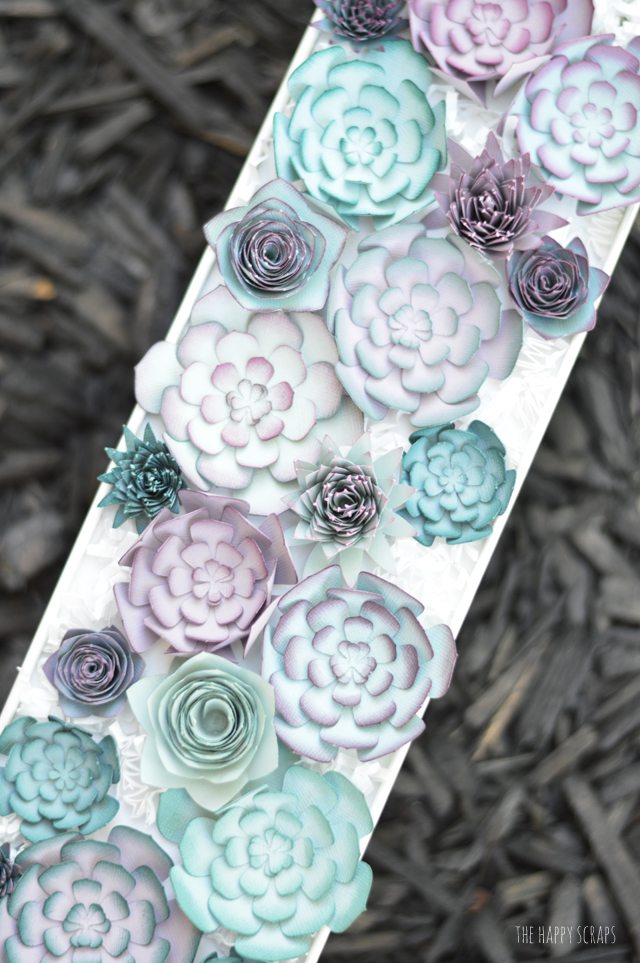
I started by cutting out all of my flowers with the Cricut Explore Air 2 machine. I pulled out my ink pads and ink daubers and then inked the edges of all the different pieces. I’m not going to lie, this seemed to take forever because of all the layers and small pieces. I enjoyed mixing the ink color with the cardstock color so all the succulents weren’t the same. Once I was finished with inking the edges, I curled all the edges. Then I got out the hot glue gun and glued the succulents together, layer by layer.

Create a stunning Paper Succulent Centerpiece that doesn't need to be watered or taken care of. It's a great piece for anywhere in the home!

I did basically the same thing for the rolled paper flowers/succulents.

Create a stunning Paper Succulent Centerpiece that doesn't need to be watered or taken care of. It's a great piece for anywhere in the home!

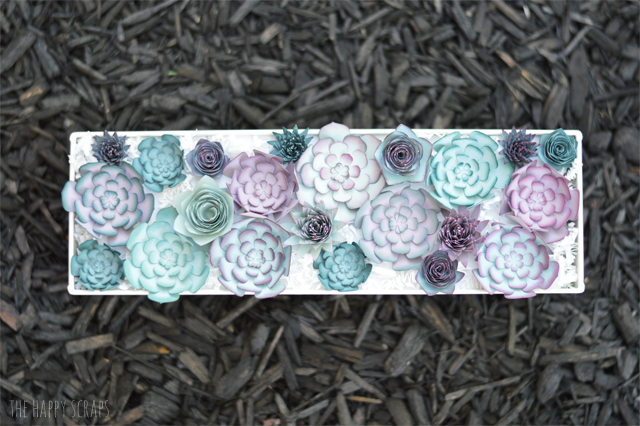
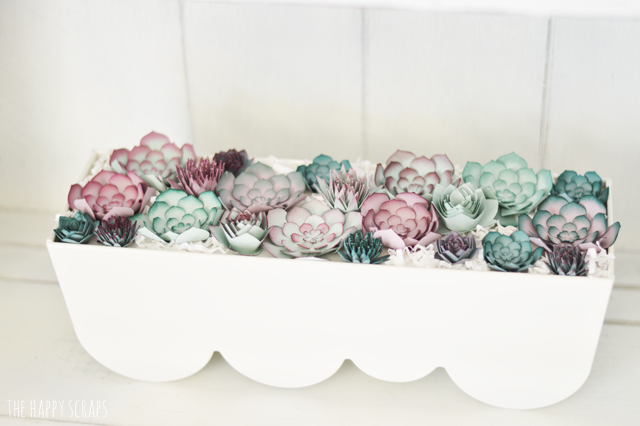
Once I had them all done, I cut a piece of foam core board to fit the top of the flower container that I was using. I found my container a couple of years ago at IKEA. Then I just started gluing the succulents onto the foam core board.

Create a stunning Paper Succulent Centerpiece that doesn't need to be watered or taken care of. It's a great piece for anywhere in the home!

I seriously can’t believe how this project turned out! It’s more stunning in person than the pictures really show.

Create a stunning Paper Succulent Centerpiece that doesn't need to be watered or taken care of. It's a great piece for anywhere in the home!

I’m so glad that I used some teal ink on the teal paper as well as purple ink on the teal paper and vice versa. It really adds to the project, don’t you think?

Create a stunning Paper Succulent Centerpiece that doesn't need to be watered or taken care of. It's a great piece for anywhere in the home!

After I got all of the larger succulents made and glued into my container, I made some smaller ones to fill in with.

Create a stunning Paper Succulent Centerpiece that doesn't need to be watered or taken care of. It's a great piece for anywhere in the home!

They may not quite look like really succulents, but they are much easier to take care of. I know some people say that succulents are hard to kill, but I’ve managed to kill a couple of them…SO, these are much easier for me to keep alive, ha!

Create a stunning Paper Succulent Centerpiece that doesn't need to be watered or taken care of. It's a great piece for anywhere in the home!

I currently have this sitting on the shelf in my craft room. I’m loving that it adds some color to my shelf and it totally matches my Cricut Explore Air 2 machine. 🙂 That kind of makes me happy.

Create a stunning Paper Succulent Centerpiece that doesn't need to be watered or taken care of. It's a great piece for anywhere in the home!

I also think it goes well with my Spring Paper Flower Centerpiece and my DIY Paper Bridal Bouquet, both of which are in my craft room.

Create a stunning Paper Succulent Centerpiece that doesn't need to be watered or taken care of. It's a great piece for anywhere in the home!

Tell me, where would you put this Paper Succulent Centerpiece in your home? Do you have the perfect place for it? Although it was time consuming, it sure was fun to make. I even think these succulents would be so fun put on a wreath. What do you think?

Filed Under: Cricut, DIY Projects, Home Decor, Home Decor, Paper Crafts, Uncategorized Tagged With: centerpieces, cricut, cricut design space, cricut explore, cricut explore air 2, flowers, ink, paper, paper flowers, succulents

« Backyard Hot Dog Roast Get Together
Cool Treats Cards »

Comments

  1. JaneEllen says

    July 12, 2017 at 8:50 pm

    Love container you put those absolutely gorgeous succulents in.
    Your succulents look like they were made by professional. Using your Cricut really helps with how paper shapes are cut out and how you embellished each piece with the ink really makes them stand out. You should be really proud of job you did in every way.
    Know how it is being stuck with no vehicle. I was stranded with 3 small kids and no vehicle. Didn’t drive til was almost 28.
    I used to be stuck at home out in middle of nowhere at time out by airbase in Tucson. Nothing close around there at that time. While after I got divorced a friend sold me an old car, taught myself how to drive, no automatics in those days, early 60’s. It’s so hard being stranded alone let alone with small kids. Used to have to take bus with 2 rowdy boys, 16 months apart was such fun. Oldest wasn’t much older than them.
    I have a Cricut Air, the first one, but due to being digitally challenged couldn’t get it installed, duh! So it sits when there are all these wonderful projects to be done with it.
    Do you get your project how’s to from Lia Griffith? Yours looked like her paper succulents. She has so many gorgeous things can make with Cricut. Do you buy your papers from Paper-Papers? Good paper, the right kind, makes such a difference to how things turn out. I too love making paper creations.
    Hope your baby feels better soon, so hard when they run a fever, not much can do for them.
    Enjoy rest of week and weekend

    Reply
    • Amy | The Happy Scraps says

      July 13, 2017 at 10:53 am

      Thank you! I don’t read the Lia Griffith blog. I come up with my own ideas that I share on my blog. I hope you are able to get your Cricut machine going soon. I’ve loved my many Cricut machines that I’ve been using for years and know that you would love to use yours as well.

      Reply
  2. Melissa Sorg says

    July 18, 2017 at 4:42 am

    I love your site. I tried following you on Pinterest by clicking Pin button, your link must be broken.

    Reply
    • Amy | The Happy Scraps says

      July 18, 2017 at 12:09 pm

      Thanks for the heads up! I’ve got it fixed now. 🙂

      Reply
  3. Amy says

    July 18, 2017 at 2:04 pm

    These succulents are seriously amazing! The things you create with paper always impress me. I need to make these to replace the succulents that I ‘tried’ to grow 🙂

    Reply
  4. Lynn Smith says

    July 21, 2017 at 1:48 pm

    loved your pictures of these succulents. my nephew is getting married and fiance wants to use succulents on the tables. to me this would be lovely, dont know about them but you did a fabulous job here

    Reply
  5. Jessi @ Practically Functional says

    July 24, 2017 at 10:32 am

    These are super gorgeous Amy! I really love the color gradient you added with the stamp ink; super smart!

    I just wanted to let you know that you were featured as a Rockstar at last week’s Creativity Unleashed party! Congrats, and thanks for sharing at our party! http://www.practicallyfunctional.com/creativity-unleashed-182-hand-lettering-giveaway

    Reply
  6. Shanice says

    July 27, 2017 at 6:29 pm

    Stunning! I hope you can come party over at my site. We would love to have you share your work!

    Reply
  7. Kim says

    October 4, 2017 at 8:50 am

    Can you share the file you used to cut these? They are gorgeous. Thank you!

    Reply
    • Amy | The Happy Scraps says

      October 9, 2017 at 7:33 am

      There is a link to the cut file in the supply list above. 🙂

      Reply
      • Crystal says

        September 11, 2018 at 5:34 pm

        The link to the cut file doesn’t work. 🙁

        Reply
        • Amy | The Happy Scraps says

          September 18, 2018 at 11:35 am

          Hi Crystal, I’m not sure why it wasn’t working. I just tried it and it opened up. It did take a minute to load though. It is a Cricut Design Space file. Let me know if you are still having issues with it and I’ll see what I can do with it. 🙂

          Reply
        • The Gardening says

          February 21, 2022 at 10:48 am

          Your Blog is very nice.
          Wish to see much more like this. Thanks for sharing your information
          The Gardening recently posted…Aloe Juvenna (Tiger Tooth Aloe) Propagation, Diseases, and CaresMy Profile

          Reply
  8. Maja says

    January 10, 2018 at 12:32 pm

    Oh my god, these are so adorable! Love the colors and how you added purple shades to the green paper. Thank you for sharing!

    Reply
  9. Liz says

    January 26, 2018 at 11:46 am

    Do you have templates for your amazing succulents?? Would love to have something like this for my tables at my wedding as I’m incorporating succulents 🙂

    Reply
    • Liz says

      January 26, 2018 at 7:37 pm

      can you also show/tell me how you did the roll-up succulents?? mine have no dimension to them!

      Reply
      • Amy | The Happy Scraps says

        January 29, 2018 at 1:10 pm

        This post shows how to roll the flowers up to make them dimensional. Let me know if you have other questions. 🙂 https://www.thehappyscraps.com/2014/03/paper-flower-spring-centerpiece.html

        Reply
    • Amy | The Happy Scraps says

      January 29, 2018 at 1:09 pm

      I don’t have templates, because I used my Cricut to cut all of the paper out. Once I cut them all out I put them together.

      Reply
  10. Valerie says

    January 27, 2018 at 11:28 am

    Gorgeous! I just love the Stampin’ Up ink colors you used. Is the bottom pad Coastal Cabana? Thanks for sharing!

    Reply
    • Amy | The Happy Scraps says

      January 29, 2018 at 1:04 pm

      Thank you! The bottom ink pad is Pool Party. 🙂

      Reply
  11. Willow Lance says

    September 6, 2019 at 10:10 pm

    Hi! I was wondering why one of the pieces of the succulent has a slit that neither of the pieces do. Are you supposed to glue those edges together? Or leave the slit open?

    Thank you!!

    Reply
    • Amy | The Happy Scraps says

      September 9, 2019 at 11:49 am

      I think I just left it open. I honestly can’t remember though. I’m not sure why the slit is there. 🙂

      Reply
      • Jennette says

        September 15, 2019 at 8:02 pm

        I don’t know why mine look so tiny compared. They look pretty so far but yours look to be different sizes. Mine all look the same size. Did you resize some of them?

        Reply
        • Amy | The Happy Scraps says

          September 16, 2019 at 11:24 am

          I really don’t remember what I did, but after looking at the cut file and the finished project, I must have cut some smaller succulents. It was probably an after thought and I used them to fill in with. I hope that makes sense.

          Reply
  12. Shelby says

    October 29, 2019 at 11:57 pm

    Hello! These succulents are beautiful and I am trying to make these for a party. I clicked on the file link and it opened the design space website but the website just wants me to download the plug-in (which I already have downloaded). Do you know why the link won’t open into the design space plug-in program? Hopefully that makes sense. Thank you!!

    Reply
    • Amy | The Happy Scraps says

      October 30, 2019 at 7:33 am

      I’m not sure why it won’t open. Maybe try opening Design Space, see if it prompts to download the plug-in (there might be an update), then try and open the cut file. I get prompted to download the plug-in quite often because of updates.

      Reply
  13. Joce says

    August 7, 2022 at 2:10 pm

    Hi! I was looking for the cardstock you bought and it links me to Amazon to view different types. Can you help me find the exact set you used? I love the ones you made specifically 😅

    Reply

Leave a Reply Cancel reply

Your email address will not be published. Required fields are marked *

CommentLuv badgeShow more posts
  • Farm Sweet Farm Front Porch Sign with the Cricut Maker 3
  • Farm Fresh Eggs Kitchen Sign
  • How to Make a Summer Hat with the Cricut Joy
  • Bless Our Farmhouse Kitchen Sign
  • Welcome to the Farm Front Door Decor
  • How to Use Offset in Cricut Design Space

Popular Posts

Page Ranking Tool

Categories

Archives

The images and text on this site are copyright of The Happy Scraps. If you would like to feature a project or image on this site please email [email protected] Thank you! Please read the Privacy Policy and Disclosure here.

Copyright © 2023 · Tasteful theme by Restored 316

Copyright © 2023 · Blog Design by Key Lime Digital Designs · WordPress · Log in

7993 shares